Sunday, December 16, 2018

KARUVEPILLAI KIZHAMBU - CURRY LEAVES KUZHAMBU


As we are counting over the last days of the year to end, am just recollecting about the choices that I made which brought out changes in my lifestyle along with courage of overcoming the new set of  challenges.  I always feel recharged when it comes to the end of the year - time to recollect and retrospect all the good and bad things that surrounded me. 

To me always, the new year has been an exciting time where everything seems new and fresh - gearing up for a fresh start to make better choices and decisions..
In the beginning of the year, I embarked on a journey to a new land to meet the high standards and goals that is set on me.  In retrospect, I am facing the truth that I am not in the place where I strived to be but with the piece of sincerity and frankness I am happy that I am not at the same place where I started the journey.

A lot had happened in one year - thanks to the Almighty for every counted blessings on me.  I am thrilled when my son outgrew me and I am hoping to see him several inches taller than his Dad.  I feel overjoyed to see DH trying to be expressive.  Feel excited when some colleagues turned into good friends and my old friends turned into family.   I am blessed to be surrounded by great leaders and good bosses who guide at every required time and push me to do better every day. 

Moving to the recipe, those who follow me or know me personally are very well familiar that most of my recipes touches the traditional root.  Karuvepillai Kuzhambu (Curry leaves kuzhambu) is one such dish which oozes out lot of medicinal benefits.  I usually prepare this once in a month to utilize the happy chance of making my people eat a healthy food.


PREPARATION:
Tamarind water - 2 cups (Extracted from soaked tamarind pulp)
Salt - to taste
Curry leaves - 1 cup
Jaggery - a small pinch (optional)
Oil - 2 tsp

TO ROAST AND GRIND:
Urad dhal - 3 tsp
Red chillies - 6-8
Peppercorns - 1 TSP
Asafoetida - a small piece

To TEMPER:
Mustard seeds -1 tsp


PREPARATION:
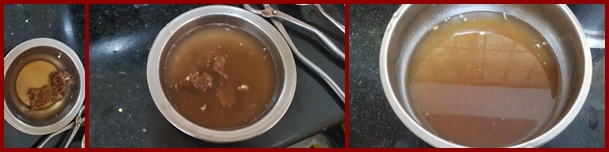
1. Extract tamarind water from soaked tamarind pulp and keep aside.

2. In a pan, roast the items given under section roast and grind in half tsp of oil (Red chillies, Peppercorns, asafoetida,urad dhal).  Grind this along with washed curry leaves adding necessary salt.

3. In the same pan, add oil, throw in mustard seeds and when it sizzles, add tamarind water and little salt as necessary and let it boil for 5 minutes.  Once the raw smell of tamarind is half gone, add the ground paste.  Make sure to add it gently to avoid forming lumps.  Mix well and let the mixture boil until the desired texture is found.  This is the period the home would be surrounded with nice aroma and you would start to feel hungry.  Lastly, add Jaggery and boil for a minute before once the consistency is reached.  Adding jaggery is an optional step.

4.  Curry leaves kuzhambu can be mixed with cooked rice with a tsp of ghee. 


.

Saturday, November 17, 2018

ARACHUVITTA MURUNGAI SAMBAR

Moving in a direction where nothing is interesting and the direction isn't clear on the destination that is going to take.  The year is taking me through with lot of changes at many ends - be it with health, role, colleagues, friends etc.   The only interesting part that I rejoice in continuing is cooking.  Though didn't write a post every weekend, I cook and at times takes pictures and share it with friends.  I find cooking as relaxing because it is the space where I get my full freedom.  With my favorite songs running mildly in background, it completely refreshes me and gears me up for the day to day challenges.


Arachuvitta Sambar is a traditional recipe made with freshly roasted and ground Indian spices along with coconut and drench you out with the appetizing aroma.  Usually prepared on special days where you want to delight the family/friends with good food.  The recipe am sharing is for Drumstick which can be replaced with any veggie of your choice.  Addition of shallot/sambar onions adds up to special flavor to the dish, however, it is an optional choice.


INGREDIENTS:
Drumstick - cut in 2 inch - 1 cup
Shallot - 1 cup
Tomato - 1
Tamarind water - 2.5 cups (extracted from soaked tamarind pulp)
Sambar powder - 1 tsp
Toor dhal - 1/4 cup
Salt - to taste
Oil - 2 tsp

To Temper:
Mustard seeds - 1/2 tsp
Curry leaves - few
Green chilly - 1 or 2

To roast and grind:
Hing - a small piece
Bengal gram - 1.5 tsp
Fenugreek seeds - 1/2 tsp
Urad dhal - 1/2 tsp
Coriander seeds - 1 tsp
Red chilly - 9
Coconut - 5 tsp (do not roast with above and add while grinding)

Preparation:
1. Soak tamarind pulp in warm water and extract the juice and keep aside.

2. Pressure cook toor dhal until soft adding a pinch of turmeric powder.
3. Roast the ingredients given in the section to roast and grind in little oil, lastly add the coconut in the pulser and grind to a smooth paste.

4. Wash and cut the drumstick in desired length and keep aside. 

 4. In a kadai/heavy bottomed pan, add a tsp of oil, add the mustard seeds, when it crackles add the curry leaves and green chilly.  Add the sambar onions/shallots followed by cut drumstick pieces, add tomatoes and mix well.  Add required salt and when the tomatoes turn mushy, add a tsp of sambar powder and mix well.  Add the extracted tamarind juice and let it boil for 7-10 minutes.  When the drumstick gets cooked, gently add the ground paste and mix well.  After couple of minutes, add the cooked toor dhal and mix well.  Add 1/2 cup of water if the kuzhambu turns to be very thick and let it boil for couple of minutes.  Switch of the stove and garnish with coriander leaves.

Arachuvitta Sambar is ready to be served.  Can be served with cooked rice dropped a tsp of ghee. 


The home would be filled with aroma when the gravy gets ready.  We had with wonderful combination of roasted baby potato and stir fried cabbage.  


Tuesday, October 2, 2018

VEGETABLE BIRYANI (VERSION 2)


I have already posted an easy version of Vegetable biryani.  This one is little bit elaborate version which is richer in taste with strong aromatic flavor derived from freshly roasted and ground spices.  As I have mentioned earlier in one of the posts, I first got introduced to biryani when I was in college.  Until then, we never know there is a vegetarian version of this dish that could be made.  One of my mom's longtime friend prepare biryani in this style and I learnt this from her.  Whenever I prepare this version of biryani, the home would be filled with aroma that would make the family to visit kitchen to find out what's being cooked in the kitchen.


INGREDIENTS:

Basmati Rice – 2 cups
Mix of vegetables – 2 cups (carrot, beans, potatoes diced in cubes or of your own choice)
Onion – 2
Red chili powder -1 tea sp
Cloves - 2
Bay leaf – 1
Cinnamon – 1 inch stick
Ghee  - 4 to 5 tbp
Coconut milk – 1.5 cups
Salt to taste
Oil – As required.


DRY ROAST AND GRIND (1)
Cloves – 3
Cinnamon – 1 inch stick
Saunf/fennel seeds – 2 tsp
Cumin seeds – 1 tsp
Peppercorns – 10
Star anise – 1

TO GRIND (2)
Tomatoes – 2 medium or big size
Ginger – 1/2 inch piece
Garlic flakes – 4 to 5
Green chilies –4
Mint and coriander leaves – handful

PREPARATION:
1.  Wash and drain the basmati rice and keep aside for 30 minutes.
2.Dry roast the ingredients given in grind (1) section and keep aside. This will be a dry masala powder. I strongly feel that this powder only makes my briyani very aromatic and flavorful.
                                     
3. Grind all the items given in grind (2) list to a smooth paste adding little water.
4. Extract coconut milk and keep aside.
5.Heat pan with some oil, add cinnamon stick, cloves, and bayleaf, allow them to sizzle, add onion and fry until translucent, and then add the ground masala powder. Later add the masala paste and fry till the raw smell goes.  

Throw in the cut veggies and add salt and chilly powder and mix well.  When the veggies are half cooked, add the basmati rice and coconut milk and water.  The water-coconut milk to rice ratio should be 1:1.5.  Lastly add 2 teaspoons of ghee and mi well and pressure cook for 1 whistle. Then lower the flame and keep in stove for 3-5 mins and switch off the stove.  You can expect people at kitchen by this time to know what's going on there..

6. Once the pressure is released, mix well and serve hot with onion raita. 

Saturday, July 21, 2018

LEMON GINGER RASAM


Lemon ginger rasam is an appetizer drink that would be well suited when you have some stomach bloating .  This is a very common recipe among South Indian Tamil Brahmin household.  Very easy to prepare and tastes super delicious.  DH likes this rasam very much and when I prepared for the first time, he just drank like a soup and complimented that he has never tasted this kind of rasam earlier.

This recipe does not call for tamarind, tanginess is derived with tomatoes and lemons.  The combination of lemon and ginger goes hand in hand and addition of freshly ground rasam powder gives out an aromatic flavor to the dish.  Also coriander leaves acts as a perfect garnishing agent and brings an earthy flavor to the dish.


INGREDIENTS:
Tomatoes - 4 medium sized
Lemon -2
Toor Dhal - 1/4 cup
Ginger - small piece (crushed or finely chopped)
Green chilly - 1
Asafoetida - a pinch
Turmeric powder - 1/4 tsp
Salt -a s needed
Coriander leaves for garnishing

RASAM POWDER
Pepper - 2 tsp
Cumin - 1tsp
Toor dhal - 1 tsp
Red chilly - 1
Coriander seeds - 1 tsp

TEMPERING ITEMS:
Ghee - 1 tsp
Mustard seeds - 1/4 tsp
Curry leaves- few

PREPARATION:

1.  Prepare Rasam powder with the ingredients given under Rasam powder.  Keep aside.
2.  Chop the tomatoes  and process them in a blender and make a juice.
3. Pressure cook toor dhal until the dhal is cooked completely.  Mash well and keep aside.
4.  In a vessel, add the tomato juice, green chilly, ginger, turmeric powder, salt, a cup of water and bring it to boil for 10 minutes until the tomatoes are cooked well.  
5. Add rasam powder, stir well, later add the cooked toor dhal.  Add a cup of water if required if the consistency of the rasam is very thick.  When it start to froth, switch off the stove, and remove from the flame.  
Heat ghee in a pan, add mustard seeds and once it splutters, add curry leaves and add the seasoned items to the rasam.  Allow the rasam to cool completely and add the extracted lemon juice.  Lemon juice can be adjusted according to the required tangy taste.  Garnish with coriander leaves.

 Aromatic lemon ginger rasam is ready to be served.  We had with potato curry and it tasted wonderful.


Friday, June 29, 2018

VAZHAIPOO KOLA URUNDAI KUZHAMBU (BANANA BLOSSOM DUMPLINGS COOKED IN TANGY MASALA GRAVY)


Just back from office and the much awaited weekend started; chilling at home relaxing myself sitting in the favorite spot on the couch.  Last few weeks have been very hectic and transitioning to more commitments and heavier workloads which is making me go insane.  With these tiring days, I could not justify myself to have a little "me" time.  To overcome the guilty feel of not having the little time for myself, I deliberately pushed myself to get into the mode of having a little "me" time today before I need to recharge me for weekend only allocated house chores.   

While there are lot of items pending in draft, I chose to post a healthier stuff which someone could try upon over the weekend - Vazhaipoo Kola Urundai Kuzhambu.  The English translation for his recipe would be Banana Blossom Dumpling gravy.  This is a gravy made with a steam-cooked banana blossom dumplings cooked in tamarind sauce.  The gravy tastes heavenly with hot steamed rice. 

The prep work is very tedious as you need to clean each floret of the flower but given the healthy nature it is worth spending time for it.  Since cleaning takes time, I prefer to make it over weekends where I clean on a Saturday afternoon or at nights while watching some TV shows after finishing the household work.   I usually make Parupu usili with this but this time DH suggested to make Chettinad dish - Kola urundai kuzhambu.  Will write a separate post in detail on how to clean the banana flower. 

INGREDIENTS:
Banana Blossom - 2 cups
Small onion - 1 cup
Tomato - 2
Garlic - few pods
Sambar powder - 2 tsp
Salt to taste
Oil  as needed

To Roast and Grind:
Hing /Asafoetida - a small peppercorn size
Channa dhal - 1 tsp
Coriander seeds - 1 tsp
Urad dhal - 1/2 tsp
Peppercorn - 5
Grated coconut - 1/4 cup
Red chilly - 2 tsp

For Tempering:
Mustard seeds - 1 tsp
Curry leaves - few

For Kola Urundais:
Bengal gram - 1 cup (Soaked in water)
Red chilly - 4
Salt - to taste
PREPARATION:
Discard the unwanted parts from the individual florets.  Then cut them into small pieces and soak in buttermilk to avoid turning black. 
Soak tamarind in warm water and extract the tamarind juice from the pulp.
In little oil, roast and grind the ingredients given in the tempering item list (Hing, channal dhal, red chilly, peppercorn, coriander seeds, and coconut).

Soak Channal dhal for 1 hour and grind it little coarsely with red chilly and salt first.  Later add the cut banana blossom and give a pulse.
Make small lemon sized balls, arrange it in a greased idly plate, and steam it for 12-15 mins in idly plate.  Allow it to completely cool before adding to the gravy.
In a kadai/pan, add oil and sizzle with tempering items, add small onion and later chopped tomatoes.  Add salt and sambar powder and mix well.  Add the extracted tamarind pulp and let this boil for 10 minutes.  When the small onions gets cooked, add the ground paste and let it boil for 2-3 minutes.  Gently add the steamed cooked banana blossom-lentil mixture balls to the gravy.  After some times, it would start to float on the top of the gravy.  
That's it, by now the gravy would have become thick and would have turned into a thicker texture.  


Transfer to a bowl and enjoy with hot steamed rice with a teaspoon of gingely oil.

Sunday, May 13, 2018

KOOZH VADAM


Vadam is a summer time traditional activity at most of the household in southern part of Tamilnadu.  It is prepared in bulk and stored for the whole year.  My mom involved me in helping her right from my 5th grade.  Nowadays, there are lot of stores who sell a variety of vadams but I always prefer to make it home as it gives me an immense pleasure and satisfaction when it is made by me.  As a working woman, I plan for this activity during my weekends.  This time, I planned in early start of the year to make it at end of April to utilize the long weekend. 

Koozh vadam is made from a mix of rice and sago flour.  As I make in larger quantity, I ground raw rice and sago mixture in flour mill (ratio of raw rice and sago is 1 kg:200 g) and make vadam in batches.  The method I follow is the traditional method followed at brahmin household which I learnt from my mom.   


INGREDIENTS:

Vadam flour - 5 cups
Green chilly - 15
Lemon juice - 10 (extracted from 10 big size lemons)
Salt - To taste
Oil - 3 tsp
Asafoetida  - a small piece of bar
Water - 12.5 cups

PREPARATION:
Mix raw rice and sago and pulse it in a mixer to a fine powder.  If making in large quantity, suggest to grind in flour mill .  The ratio of rice:sago should be 1 kg:200 g.  One kg of rice and sago mixture would yield approximately 5 cups (aazhaku) of flour.  


In a heavy bottom big vessel (I used my 10 L Pressure Cooker), add 12.5 cups of water, add 3 tsp of oil, salt, and asafoetida bar and bring it to boil.  I recommend the salt to be on the lesser side so that when we fry the vadams in oil, it would be at the optimal level.

Meanwhile, grind green chilly with little salt to a fine texture adding little bit of water.

Also extract the juice from lemons, add very little salt, and keep aside.  Recommend to do this because of the citric nature in lemons which imparts a slight bitter taste.  Adding little salt would make not turn the flavor of bitterness in lemon.  So keep in mind while adding salt in water as we also add salt in green chilly and lemon juice.

When the water starts boiling, add the ground green chilly mixture, and let it boil a minute or two.


Switch off the stove, remove the vessel from stovetop, and add the lemon juice and mix well.  Immediately, start adding vadam flour little by little and mix well with a long ladle.  Initially, it would look like there would be lumps formed while adding flour but later we can mix thoroughly.   Slowly, add the flour and stir continuously and mix all the flour in the hot boiled water and at one stage, you would end up forming a dough.  Mix well to break any lumps and form a smooth dough.  This is the basic dough for vadams.
Allow it to cool for some time.  While it is cooling, I usually make small balls out of it so that I could easily refill the dough in the press .  I do this at home before going upstairs so I would not stand in sun for a longer time.  


Take a plastic sheet and spread it the area and keep stones at the end.  Take a nada plate in the murukku press , fill the flour inside, and press a long muruku in the sheet.  
Dry in the hot sun and keep them open at home in the evening .  Let it dry for 2-3 days.  When fully dry, you can break them and store them in airtight containers.  
When required, fry in hot oil, and serve as an accompaniment for rice.